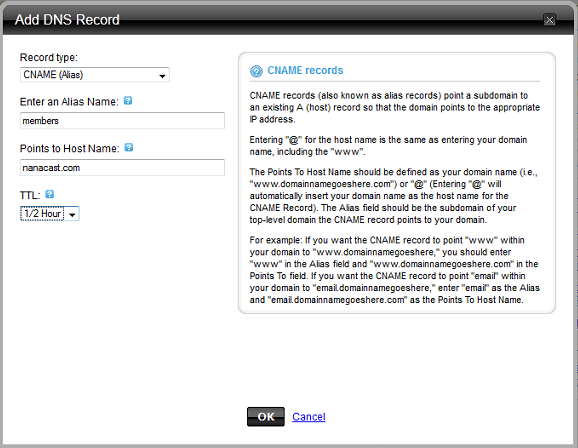
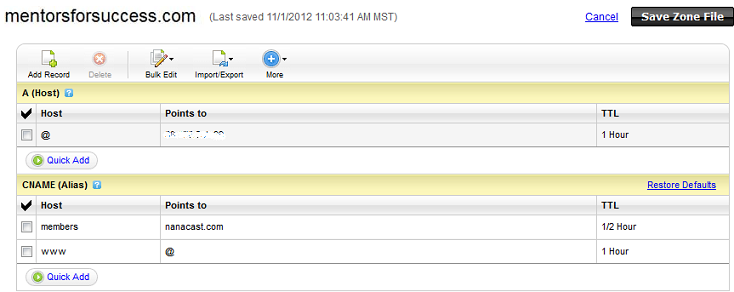
Click "OK", then click "Save Zone File".
This will resolve members.example.com to nanacast.com
NOTE: Changes will not take effect for your domain until the time set for your TTL has passed.
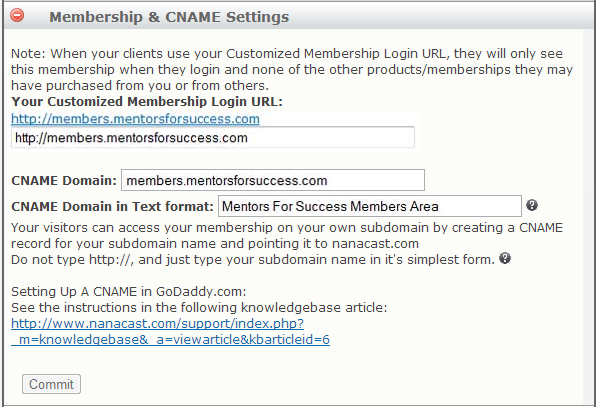
Finally, in Nanacast, on the Edit Listing page of your membership, in the Membership & CNAME settings, provide your CNAME domain and description and click Commit. Alternately, if you are using CNAME for your Custom General Purpose Membership login, then you'd set it under My Account >> Profile & Preferences, in the CNAME For General-Purpose Memberships subsection under Customized General-Purpose Membership Settings.
See the following screen shots as examples:
Setting up as a sub-domain:


Setting up as a top-level domain:
GoDaddy no longer supports this option. If you'd like to provide a top-level domain to customers, create a subdomain as in the example above, and then set up domain forwarding from your top-level domain to your subdomain, and use the subdomain CNAME in your nanacast.com configuration. This will make hits to your top-level domain forward to your subdomain name which is masking your nanacast-hosted membership login and content areas.Namecheap.com Instructions:
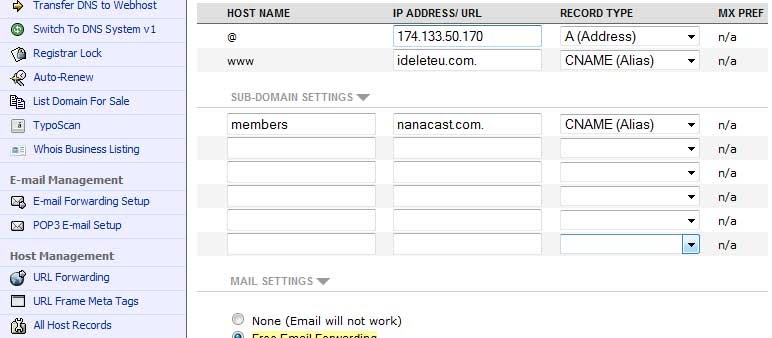
Click on your domain
Chose 'All Host Records' from the menu on the left
Edit/create/delete CNAMEs.
Note: you must add a period "." at the end of the domain in order for it to work, like this: "nanacast.com."

Three Steps to determine if you should contact support about cName issues
1. Visit http://mxtoolbox.com/CNAMELookup.aspx
2. Enter the cName URL from your cName settings in Nanacast WITHOUT the http://
3. Make sure the Canonical Name is exactly nanacast.com
If the Canonical Name does not match exactly, it is a DNS issue and you should NOT contact Nanacast.com support.
Three things to check when having cName issues (details below)
1. Verify you are a Viral Premium member
2. Verify Alias and cName Settings in Nanacast
3. Verify cName is setup correctly in DNS and have propagated
Detailed Directions:
1. Verify you are a Viral Premium member
a. Sign into Nanacast.com
b. Go to My Account >> Manage Account Type
c. Your Current Version: Viral Premium
d. Upgrade if needed
2. Verify Alias and cName Settings in Nanacast
a. Sign into Nanacast.com
b. Go to the offer/membership/product overview page
i. Manage>> Memberships
ii. Select the offer from the dropdown list
c. Click Edit Listing
d. Verify Alias setting
i. Expand Optional Hosted Sales Page Settings
ii. Ensure Alias is filled in
iii. Fix as needed
e. Expand Membership & CNAME Settings
i. Ensure the CNAME Domain is filled in
ii. Ensure the CNAME Domain in Text format is filled in
iii. Fix as needed
3. Verify cName is setup correctly in DNS and have propagated
a. Visit http://mxtoolbox.com/CNAMELookup.aspx
b. Enter the cName URL from your cName settings in Nanacast WITHOUT the http://
c. Make sure the Canonical Name is exactly nanacast.com
d. If the Canonical Name does not match exactly, it is a DNS issue and you should NOT contact Nanacast.com support.
Keywords: CNAME, GoDaddy, NameCheap